Painted nails look great. It can be costly, nonetheless. Fortunately, you can have your nails done any time you want to even at the comfort of your own home. This guide will show you how easy it is to do just that.
1. These are the must have for beautifully painted nails. You need to have them ready (as well as a comfortable workspace where you can move freely without messing up any furniture nearby). Googling for DIY nail kits is your first and necessary approach to have a fresh mani or pedi done the right way. If you already have your tools and products, you can proceed to the next step.
If you are still looking for the best nail polish products for your nail treatments, make sure you read reviews first. Here is one blog you may check for some valuable information.
Here are the things that you will need: fingernail clippers, cuticle trimmers/stick, nail file, cotton balls, nail polish remover, OPI gel polish, base coat, top coat, cuticle oil.
There are many nail polish brands that offer outstanding finish like OPI, Sally Hansen, Kiara Sky, Nugenesis, Essie, and LDS nails. You can always refer to the brand’s website for more information about the products that they offer. However, it is also a good practice to consider customer reviews posted on other sites other than the bran’s official online pages.
2.Prepare the nail surface. The best time to have your nails done is right after a shower. It is when the nails look longer as the skin shrinks or pulls away from the nails when they are soaked. They also feel softened and offer a better hold for the nail products that you will be using. Soaking your nails in warm water also helps.
After soaking and drying the nails, you need to trim and file the nails. Allow it to take the shape that will best complement your fingers. Make sure to do it gently and slowly, however, to ensure not to damage the nails and the skin surrounding them.
If you have an old polish or remains of an old polish, use a safe nail polish remover to clear them off your nails. Buffing the nails afterward will ensure that a fresh coating of a nail polish product will cling well on to your nails. Always make sure that the nail surface is totally clean before putting on a fresh coat of nail polish.
3. Apply the nail polish color. The number of times you need to paint each nail depends on how deep the color you would like it to appear on your nails. For a more solid look, it may take up to three coats of the nail polish. Make sure that each application is totally dry before putting on a second or a third coat.
4. Apply the top coat. Once you are done painting your nails with the color of your choice, you need to seal the color with a colorless top coat. Doing so will make your nail polish to last longer. It will also leave your nails shinier as well. Don’t forget to seal the nail tips by swiping the nail polish brush across each of them.
5. Clean up your workspace. Before cleaning up your space, you need to make sure that your polish has already dried up completely. Air drying takes a while, but if you are using a gel polish, you will need a LED lamp to cure the nails for about 15 to 30 seconds after each application. Your nails will come out perfectly done after.
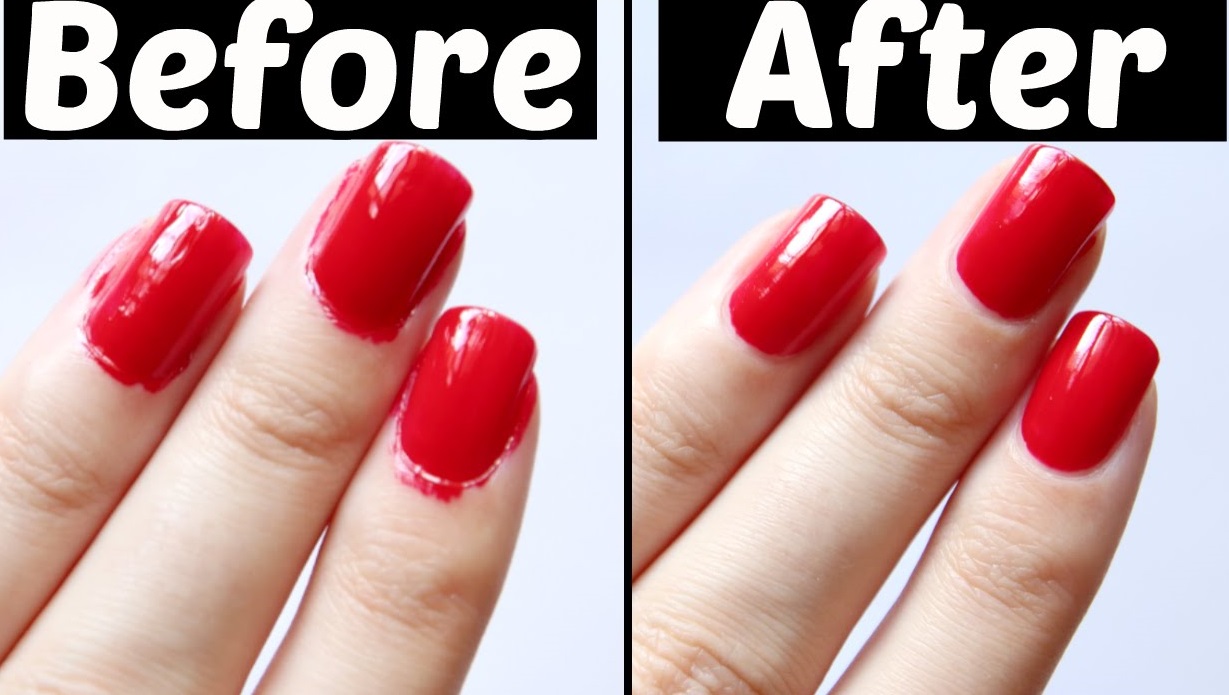
You may use an orange stick or a cotton swab that had been dipped in a nail polish remover to clean the edges around the nails for any trace of polish that clings on to your skin while applying the nail polish. Apply some cuticle oil on the skin surrounding your nails to hydrate them as well.
Don’t leave without cleaning up your workspace as well. Once you have done your nails once, you may find it quite absorbing and may want to do it all over again. Make sure you have all the tools and nail products kept in the right place before you leave your workspace.